Discover the advanced features of Xcode’s breakpoints 🐛
Hi 👋
I’m currently at the airport, on my way to Amsterdam for my last conference this year: Do iOS 🇳🇱
I’m going there to give a talk on how to get started with Swift macros and I’m sure I’ll find a way to reuse this material in a future livestream 🤫
And before we go into the topic of this email, I have a big thank you to my sponsor for another week: Proxyman ❤️
Advertisement

Need to debug HTTP/HTTPS network on iOS apps?
Try Proxyman, a native macOS app that captures and displays Request/Response in beautiful UIs.
Supports iOS device and Simulator.
Sponsors like Proxyman really help me grow my content creation, so if you have time please make sure to check out this product: it’s a direct support to my content creation ☺️
Chasing down a sneaky bug can be a frustrating experience 😩
Nobody wants to spend their day adding breakpoints here and there, to try and piece together the reason why something is not working as it should.
But whether we like or not, it’s bound to happen from time to time 🤷🏻♂️
So this week I want to walk you through the advanced features of breakpoints in Xcode: this way the next time a sneaky bug comes along you’ll be well equipped to track it down fast 😌
#01 - Run an action and don’t halt execution
Let’s start with something we’ve all experienced several times: we set a breakpoint and when it is triggered we type a command like po myVariable, and then we immediately resume the execution.
Of course, this manual operation will become very tedious if we need to perform it more than a few times.
Fortunately, it’s quite simple to automate:
Right-click on the breakpoint > “Edit Breakpoint…”
Click on “Add Action”
Select “Debugger Command”
Input your command
Check “Automatically continue after evaluating actions”

Now when this breakpoint is triggered, the debugger command will be executed and the execution will resume immediately after, thus removing any need for manual actions.
That’s a lot of time saved 👍
#02 - Conditional breakpoints
Sometimes we want a breakpoint to be triggered only if a certain condition has been met. Once again, using “Edit Breakpoint…”, it’s very easy to set such a condition:

In this example, the condition is quite simple. But more complicated expressions can be handled without any trouble: you can use boolean operators (&&, ||, !, ...) or even perform function calls.
#03 - Ignore a breakpoint
On the opposite, there are times when we want a breakpoint to halt the execution-only from the second time it is triggered.
Think, for example, of functions that are called a first time when an object is created, then called again when an event occurs. If we are only interested in debugging the second kind of calls, it would be nice to filter out the first.
Once again, using “Edit Breakpoint…” the option “Ignore n time before stopping” is here for us:

#04 - Exception breakpoints
When an exception or an error is thrown and is not caught, the application crashes and the callstack gets printed to the console. This output is often very helpful to understand what kind of error happened, but it does not really allow to inspect the situation that threw the error.
That’s when a new kind of breakpoint comes into play! Until now, all the breakpoints we have used were in some way anchored to our code, meaning that they were explicitly set on a specific line of the application.
In order to set a breakpoint that is triggered when an error occurs, we need to look on the side of symbolic breakpoints, meaning breakpoints that are not linked to a particular line, but rather to an event, in our case the occurrence of an error.
To do so, Xcode already offers two flavors of such breakpoints, depending on whether you are interested in Swift or Objective-C errors:

The great thing is that you can also edit them, in order to make them even more tailored to your need.
For instance, filtering for a specific Swift.Error type, or triggering either when the error is thrown or when it is caught.
#05 - Symbolic breakpoints
Exception and error breakpoints are a specific kind of symbolic breakpoints, but it’s also possible to define much more generic ones.
For instance, it is possible to create a breakpoint that will be triggered whenever viewDidLoad() is called on a controller:

This can be a very helpful tool when you know that a certain method is being called (for instance, a modal controller gets dismissed), and you are trying to pinpoint the source of this call.
#06 - Constraint Error Breakpoint
We’ve all been confronted with AutoLayout issues. Generally, we are made aware of these runtime issues through console error messages stating that the auto-layout engine was “unable to simultaneously satisfy constraints”.
However, in complex apps, it can be hard to understand which view exactly triggered the error. A nice way to pinpoint the root cause is to add a “Constraint Error Breakpoint” to your project.

Then, whenever a new auto-layout issue happens, the breakpoint will be automatically triggered 👌
#07 - Runtime Issue Breakpoint
Since Xcode 11, a new type of symbolic breakpoint has been introduced. Called “Runtime Issue Breakpoint”, it actually implements checks that previously had to be enabled within the compilation scheme.

Among them, you’ll find a “Main Thread Checker” that will be fired whenever a UIKit or AppKit object is being accessed from a background thread, or a “Thread Sanitizer” that will help you detect race conditions.
#08 - Column breakpoints
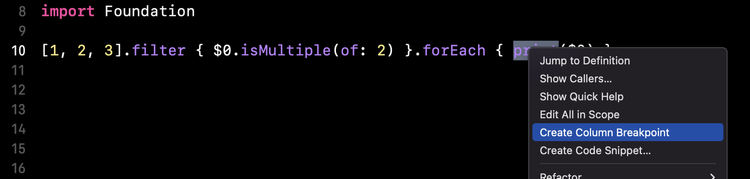
Finally, Xcode 13 introduced another kind of breakpoints that’s particularly useful when working with closures: column breakpoints.
If you have two closures defined in a single line, you can right-click on the code in the second closure and select “Create Column Breakpoint…”:
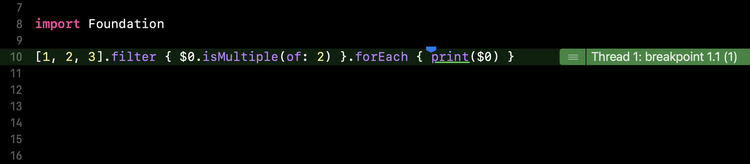
This will add a new breakpoint that will only trigger when the execution flow reaches that specific column:
That’s it, we’ve reached the end of my 8 tips to make the most out of Xcode’s breakpoints!
I hope you’ve enjoyed learning about these features and that you feel better equipped for the next time a tricky bug will come up 🐛
That’s all for this email, thanks for reading it!
If you’ve enjoyed it, feel free to forward it
to your friends and colleagues 🙌
I wish you an amazing week!
❤️